Welcome to our monthly Get Crafty project. I am bringing you these D.I.Y ideas locally from Valley Art Supplies, 76 Cottage Street, Easthampton, Ma. 01027. We are owner-operated and have been serving the Pioneer Valley for over 16 years.
I am a Mom of two children ages 12 & 8. When COVID hit last year and schools switched to remote, I had to do something to keep not only my kids engaged but many others! I started selling these Get Crafty to go kits curbside from the shop. We even started providing free local deliveries. I’ll be describing how-tos on different crafts and if you’d like to be added to our Get Crafty email list to be notified when new kits are available, simply email “get crafty” to info@valleyartsupplies.com.
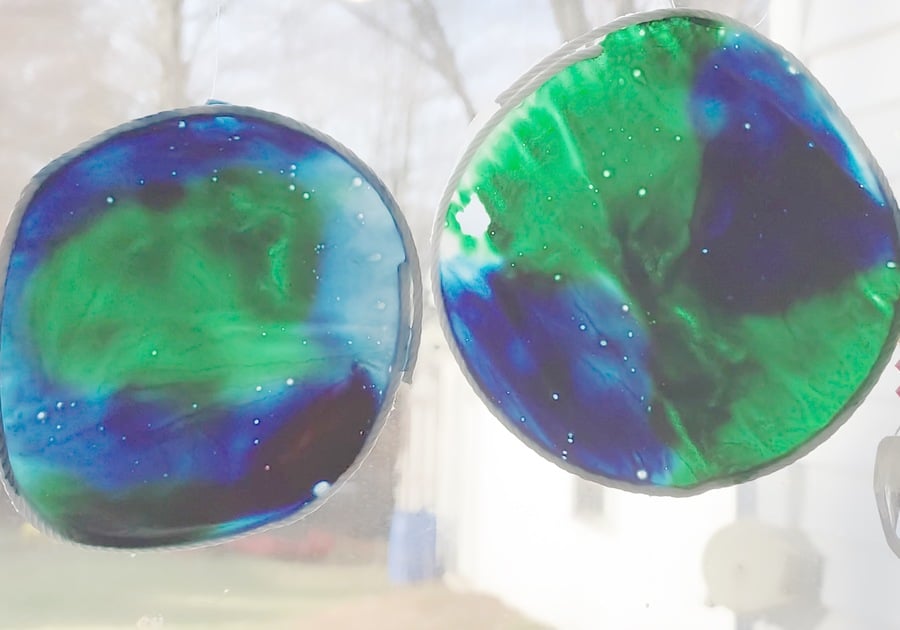
With Earth Day coming up on April 22nd, I thought these Earth “Stained Glass” Ornaments are a perfect D.I.Y.
Materials needed:
String
Floss or thinner string then above
School glue(Elmers or similar)
Cup
Blue & Green food coloring
Wax paper
Toothpicks
Circular lid or small bowl to use as a circle template
Piece of paper & pencil or pen
Scissors
- Start with your piece of paper on the table and grab your circular lid or small bowl to trace an even circle onto the paper.
- Place your string around the circle & cut a piece of string to size. Put the string aside for now.
- Place your wax paper on top of the circle template drawn on your paper.
- Get your cup and pour a little bit of glue into it(not much is needed for this step). Add your string ensuring it is fully saturated. As you pull the string out of the glue, use your thumb & forefinger to go down the string to remove the excess glue.
- Lay the piece of string on the circle(on top of the wax paper). Try to get the 2 ends to meet.
- Cut the floss or thin string into a piece that will be used for hanging.
- Carefully slide the floss/string under each string circle and secure with a knot.
- Allow this to dry completely, overnight if possible.
- The next day, fill your circle with glue trying not to overfill them. You can spread the glue out towards the circle using the toothpick or by picking up the wax paper and tip/tilt it until the circle is filled in with glue.
- Now it’s time for color! Put a number of drops of blue & green food coloring onto the glue and mix them in using the toothpicks. You don’t have to be accurate here, just have fun with it!
- When finished, allow to dry completely. It may take a couple of days. Once dry, peel them off the waxed paper and hang. By a window would be great!
I hope you enjoy these crafts as much as we do! For more information on our Get Crafty Kits, call 413-527-0763, email us at info@valleyartsupplies.com or follow us at Valley Art Supplies on Facebook.
Stay Crafty!
Juliette Mooers
Owner-operator Valley Art Supplies
76 Cottage Street
Easthampton, Ma.
01027
Share the Love - Be sure you tell them Macaroni Kid sent you... and tell all your friends!
Macaroni Kid Amherst-Northampton is a free local calendar, weekly e-newsletter, and website focused on fun family events and information in the area. We gather all kinds of local family events and activities each week and add useful information about classes, family-focused local businesses, book and product reviews, recipes, crafts, school and camp guides, and more.
Quick links to learn more about our community:
 |  |  | ||
 |  |  |